These past few months I have loved exploring the world of watercolour and trying new techniques. I recently have done quite a few watercolour paintings with a slightly looser, more abstract style of painting than I normally aim for. It is very liberating to watch the paint flow spontaneously on the paper. Watercolour is unique for its transparency and now it seems almost to have a mind of its own, especially if using wet on wet techniques.
Masking fluid is a very useful tool to have when painting, especially for watercolour artists. In watercolour, the white of the paper is the maximum whiteness and it can be very difficult to preserve small areas of white for highlights in the finished painting. Worst comes to worst, you can always ‘cheat’ a little and dab on a few bits of white acrylic paint if you haven’t been able to keep your white areas paint free. Masking fluid is essentially liquid latex which is applied to the areas of a painting that you want to protect from paint. Then you can easily paint over them and not have to worry about loosing the highlights. At the end of the painting, simply peel off the masking fluid and tadah! Instant highlights.
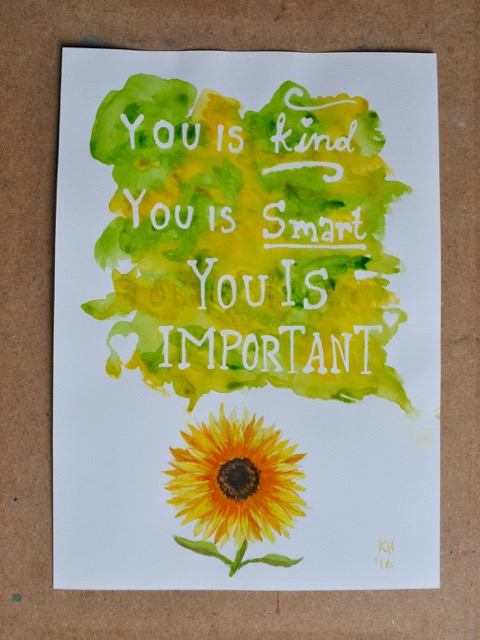
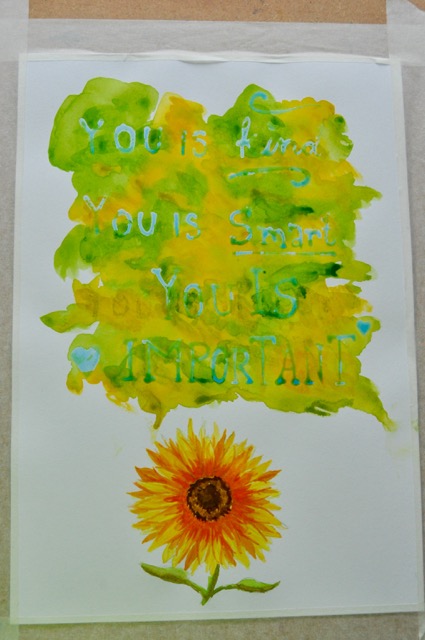
The technique used in this tutorial uses masking fluid to write a message which is then painted over using two or three different colours of watercolour paint. It requires very little actual ‘skill’ and is very quick and easy. I really love the effect it gives and I have used it to make save the date cards for a friend’s wedding, a beautiful engagement card, and finally for this tutorial, a little poster.
I have not included a tutorial for the watercolour flowers. However, to draw the sunflower, I used this cute little tutorial found here. The flowers make this easy technique extra special, but are a bit more time consuming and require more effort.

Save the Date cards for my friend’s wedding! :)

A cute engagement card that I made for my friends’ engagement party. No more spending ridiculous sums on store bought cards!
DIY Easy Watercolour Message Tutorial
Materials:
- 2-3 watercolour paint colours – I like to use colours near each other on the colour wheel, e.g. warm colours like yellow and pinky-red or yellow and a yellow-green. You can use complementary colours, but they are slightly trickier as when complementary colours mix together they create neutrals like brown/grey
- 2 large round paint brushes – I used size 10 and 16, but any will do!
- masking fluid
- a brush with a small handle – you will use the tip of the brush handle to write your message
- masking tape – to tape your paper down
- watercolour paper – 120 lb to 140lb watercolour paper works best, the thicker the paper the less it will buckle when loaded with wet paint
- a plain plate – this will be your simple palette
- a mug or bowl for water
- Hair dryer – optional, but it speeds up the drying process!
- Pastic/wooden board to tape the paper to – optional, but it allows you to more easily save your work, move it somewhere else, and come back to it rather than taping it to the table
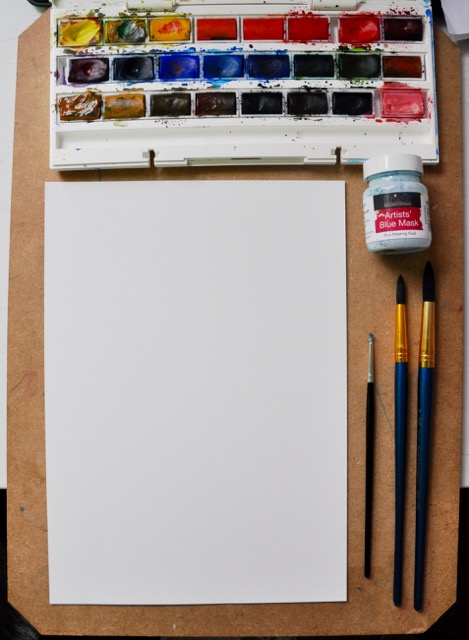
Watercolour paints, masking fluid, 2 large round brushes, a brush with a small handle, and a 9″x12″ piece of 120lb paper
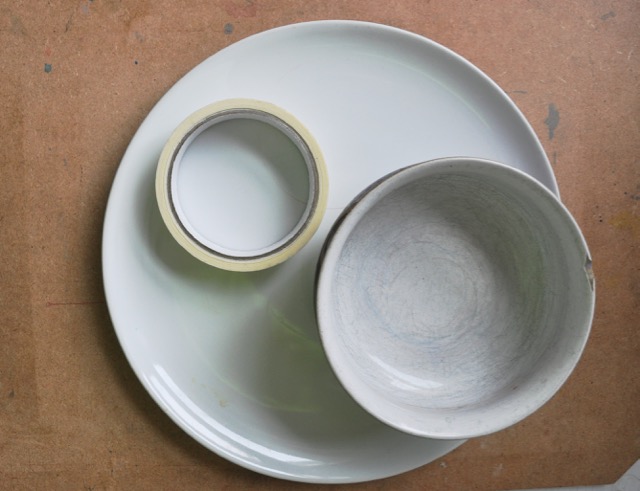
Masking tape, a bowl for the rinse water, and a simple white plate for the palette.
Step 1:
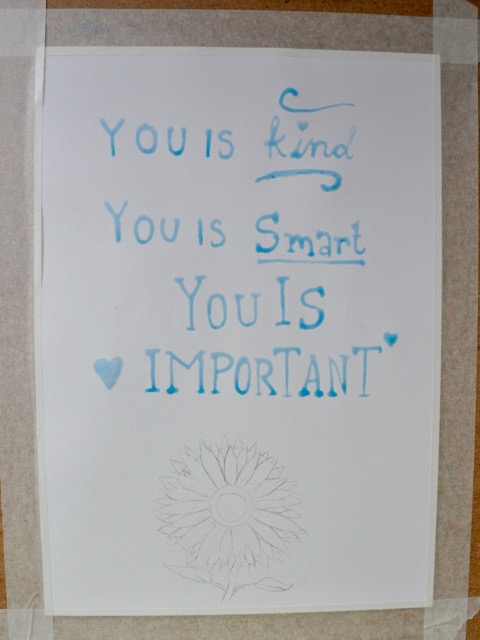
- Pick your short message
- e.g. You is kind, you is smart, you is important — this is a lovely phrase from the film/book called ‘The Help’
- Pick your colours
- In this tutorial, I am using a golden yellow and a yellow-green colour
- Cadium yellow, lemon yellow, leaf green, and a touch of ultramarine
- Tape your paper down
- either to your piece of board or your worksurface
Step 2:
- Write your message on the watercolour paper using the tip of a small brushe’s handle
- Let the masking fluid dry completely before you begin painting

Use the tip of a brush handle to write the message in masking fluid.
If you make a mistake when writing your message, let it dry then simply rub the masking fluid off with your finger.
Step 3:
- Paint over the masking fluid using broad, random dabs of paint
- Alternate between using the green paint and the yellow paint and allow the two colours to mix slightly
- Make sure all of the letters are completely surrounded by the paint
- Optional: you can add a second layer of paint once the first layer has completely dried – this will help increase the intensity of the colours

Step 4:
- Once the painting has completely dried, gently peel off the masking fluid by rubbing it with your finger tip

Thanks for reading and please leave a comment below if you enjoyed this tutorial!